The Importance of CAD Standards: Layers


Ask any CAD Manager what really annoys them in the workplace (apart from unrealistic deadlines and the stress of the job), they will all, without doubt, mention users not sticking to CAD Standards. It’s heart breaking to open up a drawing only to find out that the user has drawn everything on Layer 0. Text, Blocks, Lines, everything… the only explanations I can think of for a user to do this are either bad training or laziness.
Over the course of the next few blogs, I’m going to go through the various aspects of CAD Standards, setting up layers, creating blocks, using consistent text styles and colour palettes in DraftSight.
Let’s start today with Layers in DraftSight, what they are and how to use them.
So, just what is a layer?
When I was younger, CAD was just a dream for many drawing offices. We used to draw using pen and paper. Once the building layout was finalised, we would begin working on the interior, but rather than ruining the base plan, sheets of tracing paper would be laid over it and furniture would be positioned, kitchens and bathrooms would be laid out and tweaked. Electrical fixtures would be moved to suit the layouts. Once finalised, then they would be committed to the final drawing.
So why do I mention that? Well, you can think of the original base plan as one layer, and then each individual sheet of tracing paper as another layer. So, for example, the tracing paper with the furniture drawn on it would be one layer, the tracing paper with the electrical sockets would be another and then so on and so forth.
In CAD, each of those layers can be worked on separately, turned on or off to suit your needs. You can have multiple furniture or lighting layouts on the one drawing and using layers, can simply flip between them.
Naming your Layers
There are many different layering standards around the world. Which one of them to use, or whether to create one specifically for your business, is up to you really. The main thing is to use one and stick with it.
A good layering system will allow you to add to it over time without confusing matters.
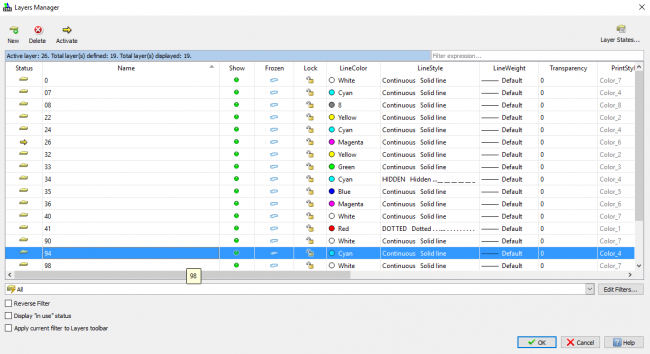
For the last 20 years, I’ve been using the same CAD Layers for all my work. Each layer has a number, LineColor and LineStyle assigned to it. So for example, layer 03 is always Toilet / Bathroom Fittings with a colour of 03 and a Dotted Linetype. Layer 08 is always External Building Walls with a colour of 08 and a Continuous Linetype. You get the idea…
So, how do you create a layer?
Creating layers in DraftSight is quite simple. From the menu, go to Format and then select Layer. The Layer Dialogue box will then appear on screen.
At the top left of the Dialogue box, click on New and a new layer (called Layer1 by default) will be created. You can set the various different layer attributes here. As each layer is created, you can set the LineColour, LineStyle and LineWeight for it.
I’ve created my layers, now what?
So, you’ve created some layers in your new drawing, now what? How do you use them?
First of all, make sure you have the Layer and the Layer Toolbars enabled in DraftSight. They generally are by default. If not, right click on the menu bar, select Toolbars and click on Layer Tools and Layers.
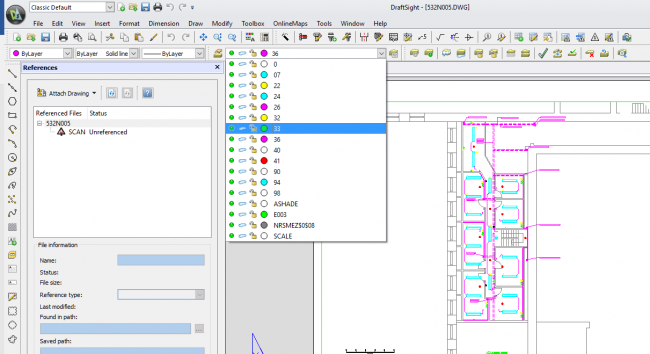
Click on the Layers toolbar and from the drop down menu, select the layer you want to draw on. That now becomes the active layer. Anything you draw on that layer, will now take on that layer’s properties.
You’ll also notice a Green Dot and a Lock Symbol in the drop down menu and you may well be wondering just what they do.
The green dot means that the layer is on and visible, if you click on it, the dot turns grey and the layer is turned off. Click on the dot once to turn it green and turn the layer back on again.
The lock symbol does pretty much what a lock is supposed to do. It locks that layer meaning that you can’t change, edit or delete anything on that layer whilst the lock is closed. Again, click on the lock and you’ll see it change from Open to Closed. Now try and delete something from that layer, you’ll find that you can’t. Click on the lock again to unlock the layer.
If you are not using XREFs in your drawings (we will cover XREFs, what they are and their usage in a later blog), I would always suggest locking the building layer of your drawing. That means you can’t accidentally move or erase an important part of the drawing! Likewise, if you have inserted a design team member’s drawing (perhaps the Lighting Layout from the Electrical Engineer), I would always suggest locking the layer so you can’t make accidental changes to it.
I think that just about covers the basics of Layers, what they are and how to use them in DraftSight. Like all things CAD related, the more you use a function of the software, the more you will realise just what you can do with DraftSight. I’ve been using CAD for more years than I care to remember and I’m still surprised at just what I can achieve using DraftSight.
In my next blog, I’ll talk about Blocks, how to create them and how to use them with your drawings.
Discover more about DraftSight and how you can boost your productivity with DraftSight Professional, a powerful 2D design solution for professionals that includes productivity tools and an API.
http://www.draftsightprofessional.com/professionalfeatures
Latest posts by MJ Smyth (see all)
- Resetting DraftSight to Default Settings - April 12, 2021
- Associative Patterns in DraftSight 2021 - March 24, 2021
- DraftSight 2021 SP0 Now Available - March 3, 2021