Recording Macros in DraftSight


There are two pieces of software synonymous with the engineering world. The first, obviously, is CAD. The second is the spreadsheet. It doesn’t really matter which spreadsheet you use, most, if not all allow you to use Macros. Most users out there will have at least heard of Macros, if not used them on a daily basis. For those who haven’t, or don’t know just what a Macro is, let me explain.
A Marcro is basically a short command you run that automates a longer series of commands. If you have a repetitive task that includes many steps, it can get quite tiresome doing them over and over again. If you record the first task as a Macro, you can then just run that Macro when you need to, speeding up the task at hand. And as I’ve said before, time is money!
You’re probably wondering why I’m talking about spreadsheets and Macros, well it’s simple really. Just like your favourite spreadsheet software, DraftSight Professional has the ability to create and run Macros built in! So in today’s blog, we’re going to learn how to create a Macros within DraftSight!
To start, open a new drawing in DraftSight an click on Tools -> Macro -> Record.
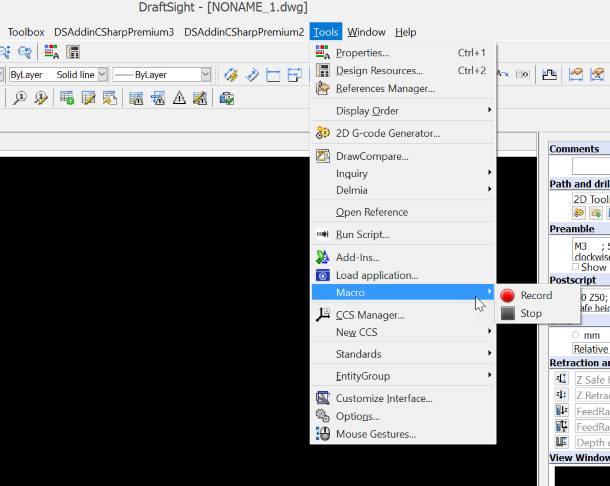
You’ll notice a small red dot beside your cursor now. This means that DraftSight is now recording your actions within your drawing.

Next we will insert some text lines into our drawing using the the standard Text and Line commands withing DraftSight.

So, we’ve created some entities in DraftSight, how do we get DraftSight to stop recording our Macro? Well, like most things in DraftSight, it’s quite easy. Just click on Tools -> Stop Recording.
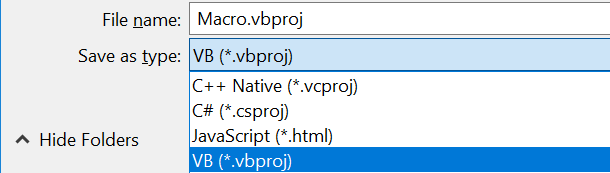
Congratulations, you have officially recorded your first Macro in DraftSight! . You will now be prompted for a location to save your Macro. Just browse to your desired location and save it as any of the following types:
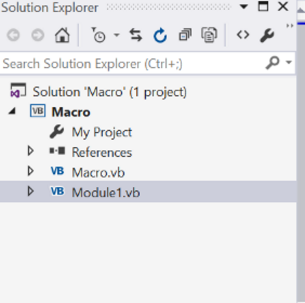
So, you have recorded your Macro and saved it as a project, what’s next? Well, now we will learn how to open the project using Microsoft Visual Studio(IDE), compile the project and build an executable file.
Open the macro project file using the browse project feature of Visual Studio. We can see a Solution Explorer that shows all the files of the project on the right hand side of VS. There are two files (for a Visual Basic project):
- Macro.VB
- Module1.VB
We now need to add a reference to the DLL files (Dynamic Linked Libraries) that have the implementation to handle the API calls from your project. To add reference, click on “Add Reference” and browse to dsAddin and dsAutomation files. Next, build the code and save the output assembly file to your desired location as an .exe file.
In future, if you want to recreate your recorded actions in DraftSight, all you have to do is run the executable as an administrator (right click on the .exe file and select Run as Administrator).
And that’s it, that’s how to create and run your first Macro in DraftSight! Obviously this is a simple example of a Macro, but it gives you some idea of the power and time saving abilities of using Macros in DraftSight. With a little bit of experimentation, you’ll be automating many tasks within DraftSight speeding up the drafting process!
Learn more about DraftSight 2018 here.
Purchase DraftSight Professional 2018 for as low as $149 here.
Latest posts by DraftSight (see all)
- Engineering Precision: Melbourne’s Grand Prix Circuit with DraftSight - March 6, 2026
- When DraftSight Needs a Fresh Start: How to Reset to Default Settings - February 4, 2026
- DraftSight Migration Guide Blog - February 2, 2026