Markup Options in DraftSight


In today’s blog, we are going to look at two of the Markup Tools available in DraftSight Professional 2018. They are Cloud and Mask tools.
So, where can you find these tools and what do each of these tools do? Let me explain.
The Markup Tools can be found on the Annotate Tab.

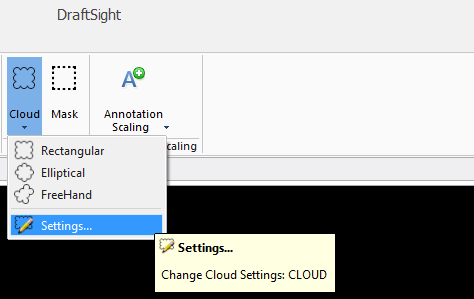
The Cloud Tool creates a revision cloud around a selected area of your drawing. If you click on the arrow to expand the menu, you’ll get the following options:
- Rectangular – Creates a rectangular shaped cloud
- Elliptical – Creates an elliptical shaped cloud.
- FreeHand – Lets you create a cloud to suit your needs.
- Settings – You can change the Radius used when creating the clouds.
To use the command, just select the type of Cloud you want from the menu and then just follow the onscreen prompts. If you want to change the radius of the cloud sections, click on Settings, the following dialogue box will appear.
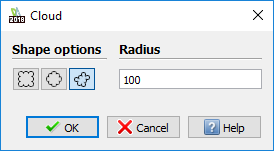
Just set your Radius for all three types of cloud and click OK.
And that’s it, that’s a quick and simple guide to using the Cloud Tool in DraftSight Professional 2018.
The next tool is the Mask Tool. What does the Mask Tool do? Well the Mask Tool allows you to draw a polygonal shape or select an existing polygon to mask / hide underlying entities. The existing entities are not erased, they are just hidden from view. After you have created the mask over a section of the drawing, you can add entities on top of the mask, such as notes.
To create a Mask out of points:
- Click Draw > Mask (or type Mask).
- In the graphics area, specify points in a sequence that define the contour of the area to mask.
- Press Enter.
To create a Mask from a PolyLine:
- Click Draw > Mask (or type Mask).
- Specify the PolyLine option.
- In the graphics area, select a PolyLine. The PolyLine must be closed and consist of Line segments with zero width.
Specify the Yes option.
To show or hide Mask frames:
- Click Draw > Mask (or type Mask).
- Specify the Frames option.
- Specify the Yes option to show Mask frames.
- Specify the No option to hide them.
Again, that’s a simple and quick guide to using the Mask Tool in DraftSight Professional 2018.
As always, the DraftSight Professional 2018 Help File is an excellent source of information for the above tools. You should check it out.
Learn more about DraftSight 2018 here.
Purchase DraftSight Professional 2018 for as low as $149 here.
Latest posts by DraftSight (see all)
- Shanghai International Circuit: The Geometry Behind the Chinese Grand Prix - March 13, 2026
- Engineering Precision: Melbourne’s Grand Prix Circuit with DraftSight - March 6, 2026
- When DraftSight Needs a Fresh Start: How to Reset to Default Settings - February 4, 2026