What are Hatch Patterns in CAD?


Hatch patterns in CAD play an important role in architectural and mechanical drawings as they can be used to identify and locate different types of materials, objects and space, to show materials used, surface qualities, or add realism to a drawing. For example, a hatch pattern could be used as a form of shading to indicate shadows.
Hatch patterns include horizontal, vertical and diagonal lines or textures that can be used to fill enclosed areas of a boundary or object in a drawing.
Types of Hatch Patterns
Add some natural warmth to your projects that enable you and your customers to vividly visualize the end product. Types of hatch patterns include:
- Stone hatch patterns and cultured stone – used for stone walls, landscaping, such as stone veneer, including cobblestone, mosaic and dimensional patterns.
- Marble hatch patterns – these hatch patterns consist of decorative patterns, used for marble, granite, and limestone countertops.
- Herringbone hatches- used to show seams, similar to a basket weave or zig-zag pattern. This pattern can be found in walls and floors, from fabrics to wood and tiles.
Tile hatch patterns- when using for floors or walls, it’s important to consider the gap between tiles in horizontal and vertical angles, and tile hatch patterns enable you to do this using custom tile hatch patterns.
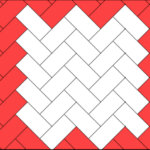
The red in the above image indicates tiles cuts needed to accommodate the floor layout design. Applying a user-defined location can help reduce this and save time and materials.
Wood hatch patterns- includes patterns of different shapes and textures such as plank, grain, floor, plywood, and timber used in structural design and interior design.
Architectural hatches- these often consist of symbols used in architectural floor plans.
Hatch and Patterns in DraftSight
How can you make hatch patterns in DraftSight? Easily. The Hatch command in DraftSight enables you to fill an enclosed area or specified entities with either a hatch pattern or a solid fill.
When you create a Hatch pattern it will be defined in one or more definition files that have a .pat file extension.
There are different commands and features for placing a hatch. Understanding the attainable results using the different tools can quickly improve drawing quality.
Applying a Hatch Pattern
The normal workflow to create a hatch is simple and quick. Select the hatch pattern you want to use, then click inside the area you want to hatch, or vice versa. You can select a pattern from the drop-down selector, or by clicking the button to the left of it to access the Select Pattern Style dialog box. Adjust settings such as angle and scale as needed.
A large selection of ANSI, ISO, Sample, and Custom hatch patterns are pre-installed with DraftSight. User-defined patterns can also be created. Control options including angle, scale, spacing, etc. are available to adjust the selected pattern as needed.
In DraftSight there are four groups of Hatch patterns: ANSI, ISO, Sample, and Custom. Each group contains a set of default patterns. Through the Hatch Creation/Editor contextual ribbon tabs, it is possible to select the type and pattern from drop-down lists, or a Select Pattern Style accessible from the Pattern panel. The Type drop-down options act as filters for the available Pattern Styles. The latter selection system can be preferable once accustomed to the hatch types.

The above images illustrate the Hatch Creation contextual ribbon tab, the section related to hatch patterns, and the pattern style selector shown when the icon button is selected.
You can find the Hatch command here:
Workspace: Home > Draw > Hatch
Workspace Classic: Draw > Hatch/Fill
Toolbar: Draw > Hatch/Fill
Keyboard Shortcut: HATCH
Setting a Hatch Pattern
1. Open your drawing.
2. Click Hatch.
3. In the Hatch Creation contextual ribbon tab, click on Select Pattern Style in the Pattern
4. Select the standard and desired hatch pattern then click OK.
NOTE: It is possible to create custom hatch patterns by modifying the Sample.pat file located by default in C:\Program Files\Dassault Systemes\DraftSight\Default Files\Support.
5. Select your boundary settings (Specify Entities or Points)
6. You can now insert your hatch pattern into your drawing
*Example used is from the “DraftSight – Work Smarter Not Harder Training Guide” download your copy now.
Edit Hatch
Hatch patterns are often used to differentiate materials used in construction drawings. The ability to alter existing hatch pattern provides a quick and easy way to adapt drawings to reflect necessary changes in materials.
Depending on the drawing size or scale, the applied hatch pattern may be larger or smaller than preferred. Rather than create a new custom hatch pattern, it is possible to change the pattern scale.
Additionally, the hatch pattern angle is adjustable to produce another hatch fill effect from a single style.
Other editing options include the ability to edit the pattern type, fill, and color. In addition to the presentation of the hatch, it is also possible to rebuild boundaries around hatch removed accidentally, to delete entities that are acting as hatch boundaries, or to highlight boundaries.
Selecting an existing hatch will automatically display the Hatch Editor contextual ribbon tab in the ribbon. When editing hatch, several new options are available.
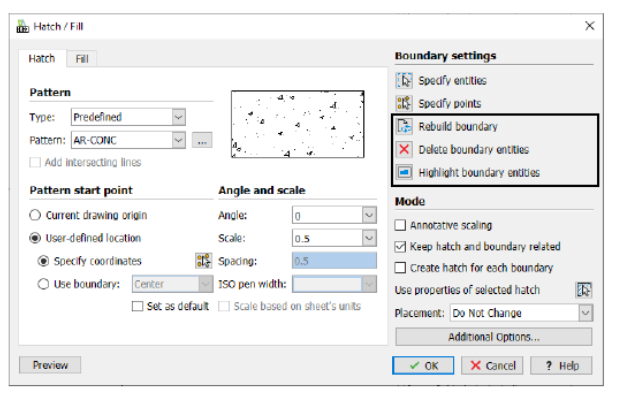
The below image illustrates the Hatch Editor window and highlights the options only available when editing hatch.
You can find the Edit Hatch Tool here:
Workspace: Home > Modify > Edit Polyline > Edit Hatch
Workspace Classic: Modify > Entity > Hatch
Toolbar: Modify > Edit Hatch
Keyboard Shortcut: EDITHATCH
In addition to merely creating or editing hatch, it is possible to adopt properties from one hatch and apply them to another. Property changes include the layer, scale, and rotation.
You can also copy entities along a path that can be represented by a line, polyline, arc, circle, ellipse, or a spline with the Pattern Paths command. In addition to simply copying, the command allows for a distance and number of copies to be created, which creates an equally spaced pattern. Also, it’s possible to apply a measurement that defines the intervals at which copies along the path should be made.
DraftSight also features the Power Trim command with Trim and Extend tools that can be used to clean up and finalize design areas. Using these tools will ensure precise edge cuts, providing a clear face of drawing results while easing future drawing maintenance tasks.
That is a glimpse of what you can do with hatch patterns. To learn about the latest features in DraftSight visit: https://www.draftsight.com/product/2d-cad/features.
If you are looking to expand your CAD capabilities, give DraftSight a try. You can explore how DraftSight can transform your design workflow with a free, 30-day trial of DraftSight Premium.

Latest posts by DraftSight (see all)
- From Napkin Sketch to Shop Floor: Why Knapheide Embraces DraftSight - July 2, 2025
- Summertime CAD Project Ideas - June 30, 2025
- Xrefs Explained: Enhance Your CAD Workflow - June 23, 2025