Automatic Dimensioning – Making the Switch with Lynn Allen. DraftSight Tips for AutoCAD Users


Hi everyone, Lynn Allen here, and I’m super excited to introduce my brand-new blog! It’s called Making the Switch with Lynn Allen. DraftSight Tips for AutoCAD® Users. I hope you can join me every Wednesday as I share some awesome tips that will help convince you to make the switch to DraftSight.
I’ll show you how easy it is for my AutoCAD friends to use DraftSight and offer some compelling reasons why you should switch. Of course, the number one reason most people make the switch is because you can save some serious cash since you can use DraftSight for a fraction of the price you pay for AutoCAD. Those of you with money trees growing in the backyard won’t be as interested in my blog.
You’ll hear a lot about how an AutoCAD user will feel completely at home in DraftSight. The interface is familiar, and the command aliases map to their AutoCAD counterpart, so you don’t even have to worry about learning the corresponding DraftSight command name. And there are some fabulous tools in DraftSight that aren’t even in AutoCAD, which is just the icing on the cake!
One of them is something I’ve wanted for years. Since I’m all about picks and clicks and saving time, I’ve always wanted an “easy button” for dimensioning. Something that lets you just select an area around your drawing, and Bam! The software does the work for you. Guess what? DraftSight lets you do that. It’s appropriately called Auto Dimension (but I call it Magic).
How it Works:
Auto Dimension makes linear and radial dimensions a snap. It uses your current Dimension Style and lets you control their placement. It’s a simple two-step process – a far cry from what we have to do in AutoCAD.
The first thing we need to do is to select what we want to Dimension! We do this by creating a Bounding Box. There’s a couple of ways you can make a Bounding Box. You can find it in the Annotate tab of the Ribbon – the drop-down icon right next to the DimStyle.
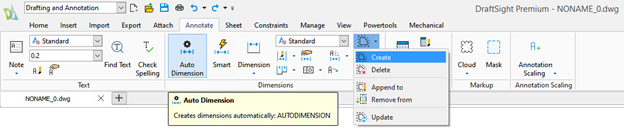
Click on Create, then just draw a box around your objects.
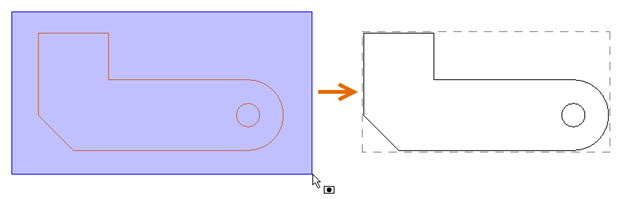
You can also select your objects first, then use the right-click popup menu to create the Bounding Box. Either way, it’s just a few clicks, and for me, the fewer the better!
The next step is to apply your dimensions. Click on the Auto Dimension tool from the Ribbon to get started. The Auto Dimension palette will turn on and this is where you can customize how you want your dimensions to appear.
For both Horizontal and Vertical Dimensions, you can specify whether they’ll be Baseline, Continuous, or Ordinate dimensions. You’ll also need to decide if you want the Horizontal dims to be placed above or below the bounding box, and whether the Vertical dims are to the right or left.
You’ll see all the geometry types that are within the Boundary Box listing in the bottom pane. They’re all considered to be dimensioned by default, but you can remove anything you don’t want from there.
Feel free to try different schemes and positioning. Nothing is set in stone until you accept the Preview by clicking the Apply button.
That’s it! Create a Bounding Box, then choose the type and position for your dimensions, and they’ll
be added to your drawing, without you having to spend all those picks and clicks creating them. Try doing that in AutoCAD!
You really should give it a try; I think you’ll like not having all that wear and tear on your mouse finger! By the way, the 30-day trial of DraftSight Premium is absolutely free and available to download here. Give it a spin today!
Ready to learn more? Join Lynn Allen LIVE!
Technology Evangelist and AutoCAD expert Lynn Allen will host live webinars on Wednesday, May 12, 7 pm EDT, and Thursday, May 13, 11 am EDT as she explores DraftSight from the perspective of an AutoCAD user.
From installation and exploring the familiar user interface to using key commands and features, Lynn will demonstrate how easy the transition to DraftSight can be. Join the webinar and see how you can maintain the same level of productivity for a fraction of the price with DraftSight!

Lynn Allen
Latest posts by Lynn Allen (see all)
- Layer Properties Manager in DraftSight - April 21, 2023
- How DraftSight’s Image Tracer Delivers Accurate CAD Entities - March 17, 2023
- Add Your Own Command Aliases in DraftSight - March 3, 2023