Under the Radar: Learn How to Streamline Workflows with Design Resources in DraftSight

I absolutely love Design Resources, but sometimes it flies under the radar for a lot of DraftSight users. And if you are a fan of DesignCenter in AutoCAD, you will definitely want to tune in to learn more about Design Resources.
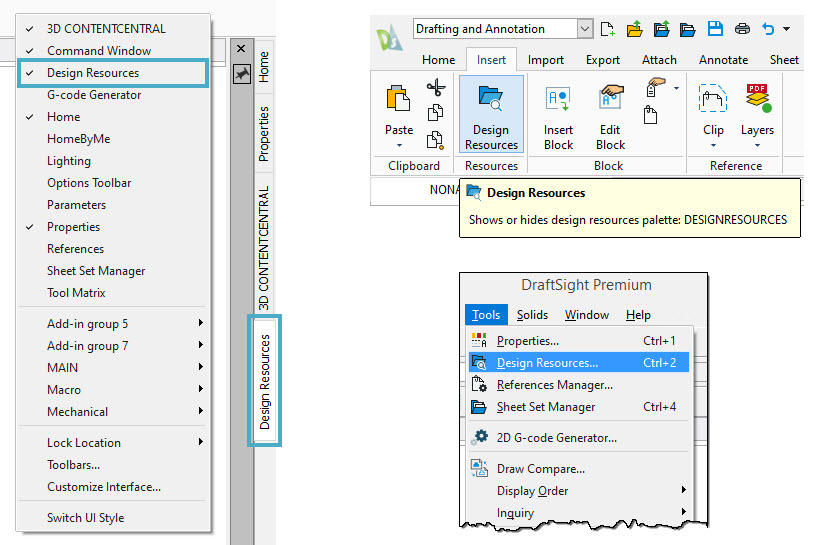
First things first – Design Resources is not displayed by default, so let’s discuss how to turn it on. Design Resources is a palette, so you can access it like you do any other palette – by right-clicking on a palette sidebar or anywhere in the Ribbon. It can also be found in the Ribbon under the Insert tab. Finally, if you use the Classic workspace, you can find it under the Tools pulldown. Or, similar to DesignCenter in AutoCAD, you can access it with CTRL-2 as well. The bottom line here – there are many ways to get to this amazing tool!

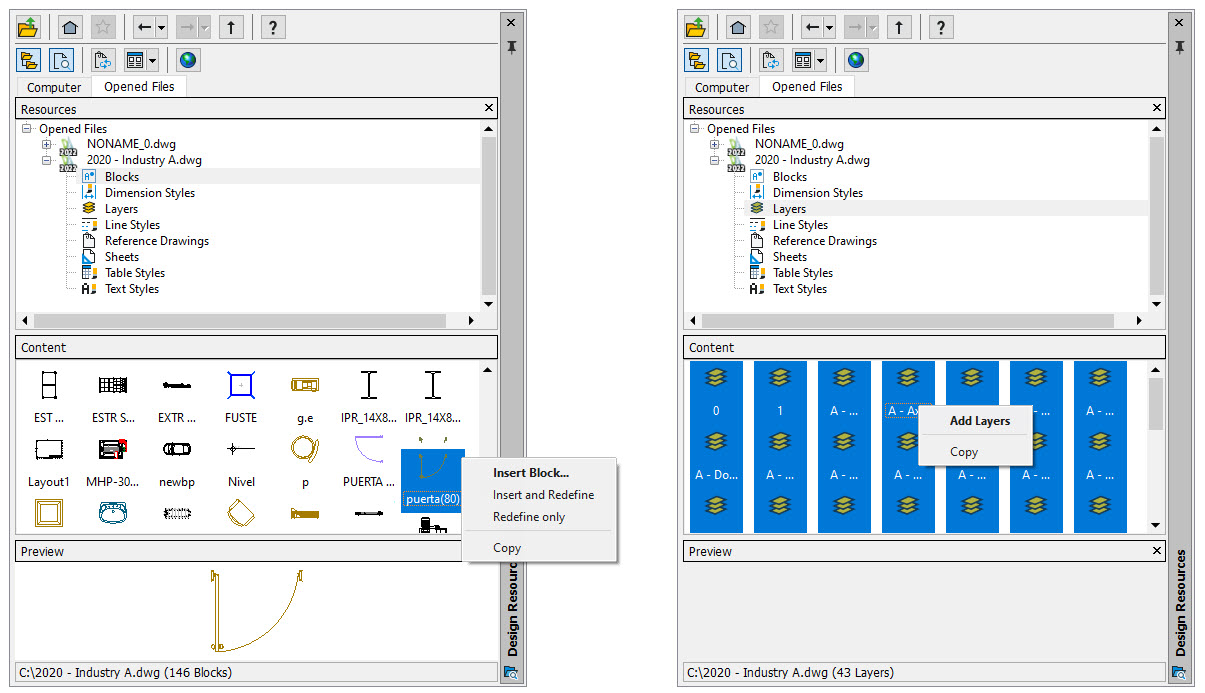
“I got it Lynn, but what does it do?” Quite simply, Design Resources is a super handy approach to import various type of content from other files. Who hasn’t needed to do that from time to time? In my last post I mentioned it in the context of bringing in all your Layers. You can also import any or all of your Styles, Sheets, Xrefs or Blocks.
Let’s take a look at the interface, some of the options within Design Resources, and how you add content to your current drawing.
The palette has a menu area at the top, then a Resources pane with two tabs, a Content pane, and a Preview pane (which can be turned off it you prefer). The whole concept is pretty simple. Just navigate to the file you want to access and open it from within the interface. It doesn’t have to be a DWG file either – you can also choose from DXF, DWS, or DWT files.
Let’s first concentrate on where you do the file navigation… within the Resources area, and in particular, the two tabs. One is Computer, and the other is Opened Files. Over the years, I’ve found that if I’m importing content from another drawing, it’s either A) one I already have open, or B) one I’ve opened recently. That’s why it’s my preference to use the Opened Files tab. It’s just easier to quickly find your content in Opened Files than it is navigating through the Computer tab (more on that tab in a minute).
To bring in the content you need, you can simply drag and drop a Content icon, or right click to access your options. You can choose a single item or multiple (bonus tip, highlight one icon then use CTRL-A to select them all).

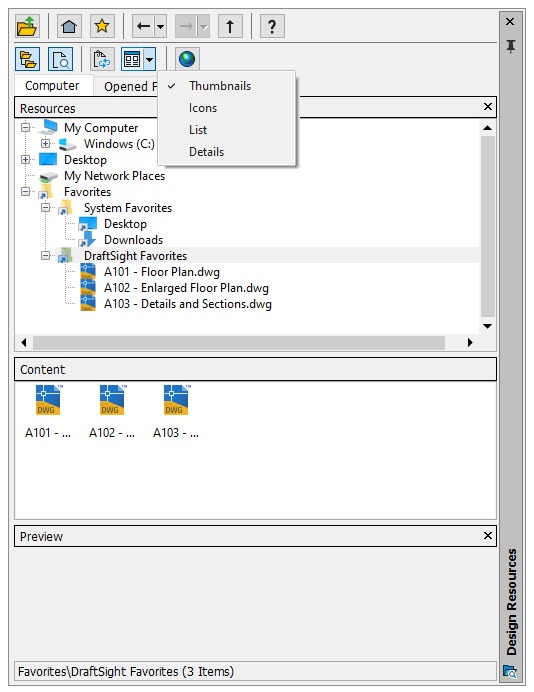
On the Computer tab, you’ll get the usual suspects (My Computer, Desktop, Network, etc.) but there is one cool item I want to share with you. Whenever you have a file or folder that you know you’ll be returning to, you can right click on it (from the Design Resource tool) to mark it as a Favorite. It will then appear in the DraftSight Favorites folder. Now I still tend to use my preferred method of Opened Files, but I know a lot of people who absolutely love using DraftSight Favorites.
The icons in the toolbar are all pretty self-explanatory. You can change your Resources from a tree view, use the Star to set a Favorite, or even click on the blue globe to change how you view your content.

So, there you have it. Design Resources is such a valuable tool, but so many users that I talk to don’t even know it exists. Now that you do, I hope you can streamline your workflow by taking advantage of it.
And, I have more good news. If you’re not a DraftSight user (yet), you can give Design Resources and all the other great features in DraftSight a try for yourself. Just go here to download a fully functional trial, absolutely free for 30 days.
As usual, don’t just take my word for it, see for yourself how switching to DraftSight might just be the right choice for you.


