Favorite Tools and Productivity Features in DraftSight


Check out our new eBook, Power of DraftSight, and learn how you can maximize your use of DraftSight and learn about a few of the differentiating tools and productivity features that set DraftSight apart from the competition.
Here are a few of the highlights:
#1) Power Trim
Save time by using the PowerTrim command to efficiently edit your geometry.
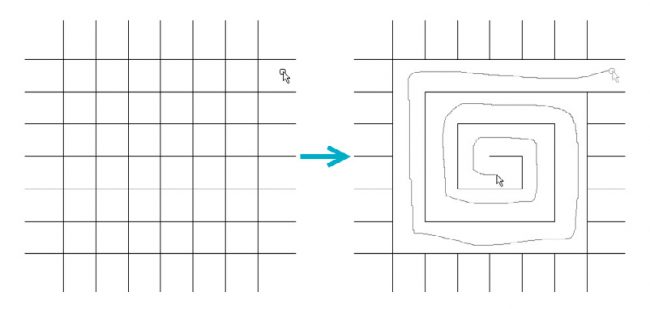
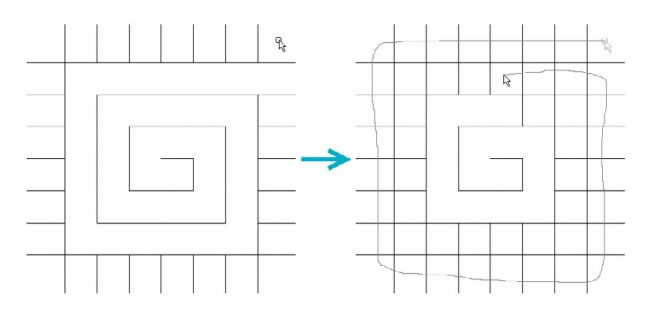
Found only in DraftSight, the PowerTrim tool allows you to quickly and accurately trim multiple entities by simply dragging your pointer across them. Since PowerTrim automatically considers everything in your drawing to be a cutting plane, you can save time and lessen your frustration by not having to identify and select those entities individually. You can even change the behavior of PowerTrim to make it Extend entities in the same manner, simply by holding down the shift on your keyboard.
PowerTrim is found in the Modify panel of the Ribbon’s Home tab. By selecting individual entities, you can also use PowerTrim to extend or shorten them along their current paths, or let it do the work of finding and extending to an inferred intersection point.
#2) Dimension Tools
Increase your productivity by utilizing time-saving dimension tools.
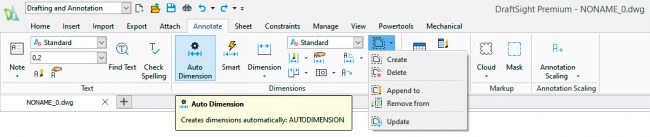
In addition to the traditional individual dimensioning commands, DraftSight adds two powerful tools that can save you time by automating your tasks. Both can be found in the Dimensions panel of the Annotate tab. The Smart Dimension tool inserts the proper type of Dimension by detecting the type of entity you select.
By using Smart Dimension, you no longer have to stop your command and select a new one just to use a different type of Dimension. In our example, the Linear, Aligned, Radial and Angular Dimensions were all made by running the Smart Dimension tool once. In many cases, the Auto Dimension tool can eliminate the extra work of adding dimensions to your design. Auto Dimensioning is a two-step process. First, you must create a Bounding Box, which is also found in the Dimensions panel. Then you select the entities within the Bounding Box that you want to dimension. You can set various options in the Auto Dimension palette, preview and apply the Dimensions when you’re satisfied with the result.
#3) Mechanical Toolbox
Tap into the power of the mechanical toolbox to create designs faster and with more accuracy.

DraftSight contains robust mechanical tools and symbols that will help you standardize your mechanical drafting needs. You don’t need to purchase a third-party program add-on, or worse, different CAD software, as this industry-proven suite of tools is built right in. The Mechanical Toolbox allows you to choose which industry standard you want to use (or create your own custom standard). Continue your design by accessing your symbols from the extensive library included in the Toolbox. Choose hardware such as bolts, nuts, and washers, or from various screw and hole configurations. Finally, DraftSight can automate the task of creating and tracking a bill of materials, and even help with tracking your drawing revisions.
#4) Toolbox Layers
Maintain your drafting standards by setting the layer for the type of entity.
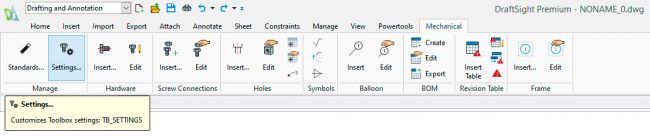
The Toolbox Layer Settings feature allows you set which layer a specific entity is placed upon. It helps you maintain your layering standard and removes the need to change the active layer prior to adding different entities. You can access the Layer Settings from the Manage panel of the Mechanical tab in the ribbon. By default, it uses its own set of layers (prefixed with TB_ ), but you can also access your own layers that are in the drawing. In addition to the Mechanical Tool-box specific entities, you can also assign a layer to any other standard entity that DraftSight creates, which makes Toolbox Layers a valuable tool even if you don’t need the other Mechanical Toolbox functions. Mapping your layer settings is easy.
From the Toolbox Settings dialog, simply find the entity type you want to use, then select the Layer it will be placed on from the pulldown. Should you choose, you can also specify the LineColor, LineStyle, or LineWeight as well. Make sure the Enable Predefined Layering box is checked, and you’ll no longer have to worry about changing your active layer whenever you draw those types of entities.
#5) Mouse Gestures
Increase your productivity by accessing your most frequently used commands with mouse gestures.
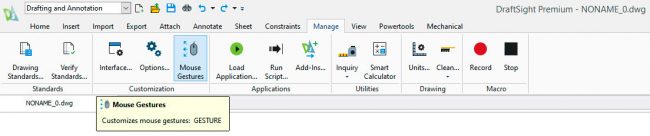
Mouse Gestures provide a fast and convenient way to speed up your drafting technique, saving you time and increasing your efficiency and productivity. When it’s enabled, you can access various commands by simply holding down the right mouse button and moving the mouse in the proper direction. The gestures are easy to set up. You can access them from the Customization panel of the Manage tab.
DraftSight allows either four gestures, which correlate to moving the mouse forward, back, left, or right, or eight gestures, which add the diagonal directions. This example shows default values, which you may like, but setting up your own most frequently used can significantly increase your speed and production.
Simply uncheck the currently assigned commands, then search for the command you want. Once found, use the Gesture Selection Pulldown to choose your direction. In our example, we’re changing the default down gesture from Save to PowerTrim. Simply uncheck the currently assigned commands, then search for the command you want. Once found, use the Gesture Selection Pulldown to choose your direction. In our example, we’re changing the default down gesture from Save to PowerTrim. When you execute a Gesture, DraftSight will display a Gestures Navigation Guide when you keep the right button depressed. It will show you which command you are about to begin. You can release the mouse button to accept it, move the cursor over the icon, or even choose a different command to execute.
Latest posts by DraftSight (see all)
- Explore Easier Dimensioning with DraftSight’s AutoDimension - April 25, 2024
- DraftSight Mechanical: A CAD Revolution for Mechanical Design - April 18, 2024
- Empowering Designers with Efficiency and Ease – DraftSight’s G2 Reviews - April 17, 2024